
A customized wooden sign is a great way to add a personal touch to any space. In just a few easy steps, you can create wall décor that is completely unique and perfect for you! Keep reading for the step-by-step guide that anyone can do. No artistic ability required!
Sure, there are tons of adorable wooden signs out there, but trying to find one with your favorite obscure Gilmore Girls quote on it? Good luck. If you have a favorite inspirational quote or fun saying that you’re dying to hang on your wall, follow these simple steps to make your own DIY wooden sign.

What you’ll need:
- wooden board or plaque
You can pick up a board from a home improvement store (or your tool shed), or purchase an unfinished plaque from a craft store.
- scrapbook paper
- Mod Podge
- sponge brush
- acrylic paint
- Sharpie markers (optional)
- stencils (optional)
Start by prepping your scrapbook paper. Trace the shape of the sign onto the paper, and cut it out. For some of my signs, I mixed and matched a few different papers to bring together the color scheme of the room these were going in.
Next, apply a thick and even coat of Mod Podge to the wood, and place the scrapbook paper, print side down, on top. Let the sign dry completely (about 4 hours).
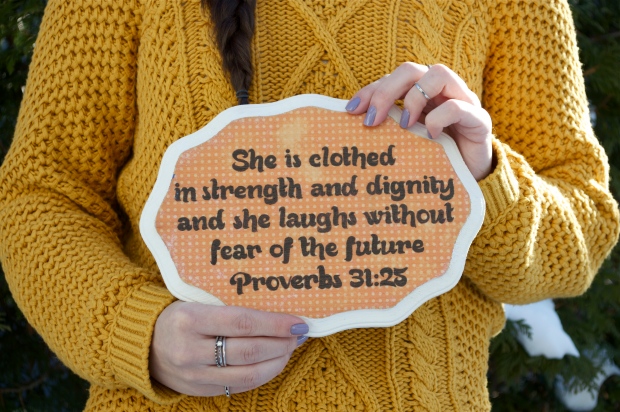
Once the signs are dry, use your hands to drizzle some water onto the dried scrapbook paper. Then rub the paper off gently, continuing to wet your hands as needed. You might lose some of the design during this step, but for the most part the paper will rub off leaving only the design on the wood. Don’t worry about any little imperfections. That’s part of the charm of these rustic wall hangings.

Next, I painted the edges of my signs with white acrylic paint for a more shabby chic look, but you can paint them any color you want or leave them natural.
There are a few options when it comes time to add words to your sign. For beginning crafters, I would recommend investing in some stencils to take the stress out of this important step. Trace your letters with pencil, then fill them in with acrylic paint or a Sharpie. For someone a little more art-savvy, try this easy text transfer trick. It’s super simple but requires a little more time, patience, and a steady hand. If you’re a master calligrapher (which, sadly, I am not), go right ahead and freehand to your heart’s desire.

The final step is to add another layer of Mod Podge to your sign to seal in your design. Just make sure your paint or marker has dried completely, so it doesn’t streak when you paint over it.

Not only are these signs personalized and adorable, but you can easily hang them with Command Strips or putty, which won’t damage your wall.
And there you have it! No need to buy a sign ever again. Happy crafting!

I really like this project. Do you mind if I link to your post on my blog’s Friday round-up list of DIY ideas? 🙂
LikeLike
Sorry it took so long to respond! Please feel free to share this post. I would love that!
LikeLike